
I’ve been frustrated by the Netflix VPN/Proxy error messages, finally i found a way and there is a workaround. Ever since Netflix implemented its overseas VPN ban–preventing customers and other show catalogs from abroad VPN providers and users alike have been steeping ground for a solution.
When I connected to most VPNs, Netflix gives the following error, accompanied by error code m7111-1331-5059: such as below error message while playing any video

This trick will work on your Laptop, Desktops, Mobile phones, Tab's, SMART TV's or any additional devices that you are using to watch videos which I successfully tested and for that you don't need to install or Buy any VPN.
I heard there are some VPN's if you buy then you can change the region and watch Netflix videos of that region's but i never tested yet and not sure if its really works or not.
Anyway, I like Free stuff's and I don't wanna spend money and regret after 👻 If you are too free users then,
Find my step by step manual instructions below:
Below setting is for Windows systems :
Below setting is for Windows systems :
1. Right-click on the “Start” button, then click “Settings”.

2. Click on “Network and Internet”. Click on “Network and Internet”.

3. Click on “Network and Sharing option”.

4. Click on the interface [Ether through which you are connected to the Internet in my case i connected to my WiFi .

5. Interface tab will open through which you are connected to the Internet and click “Properties”.

6. Uncheck the Internet Protocol Version 6 (TCP/IPv6) and Click "OK"

7. Double-click on Internet Protocol Version 4 (TCP/IPv4)
8. In the General tab click on Use the following DNS server addresses.

9. I Preferred Indian DNS server because i wanna watch Bollywood movies so i selected DNS 35.154.249.83 and Alternate DNS 169.38.73.5 belongs to INDIA.
* You can select any of other DNS Server List here hxxps://www.smartdnsproxy.com/Servers
11. Make sure Validate settings and check is your traffic really passing through DNS server or not, Below is the way i always check.

12. Windows Network Diagnostics will start and run for a little while, just let it run. Once the diagnostics have run click on close.
13. Restart your computer if Needed.
Also you can change DNS servers on router which helps route traffic from your Mobile device, Tab's, iPads, SMART TV's and any additional device OR you can use below steps if above step not work on your Laptop/Desktop
Go to Network -> select "WAN"
Change the DNS servers Click "SAVE"

* Please Note for Desktop Users who using router some people direct connect WAN cable to CPU, This setting only work if connection made with router like below in picture

Additional :
As per multiple user requests adding DNS modification settings for MAC
- Go to the Apple menu and select “System Preferences”
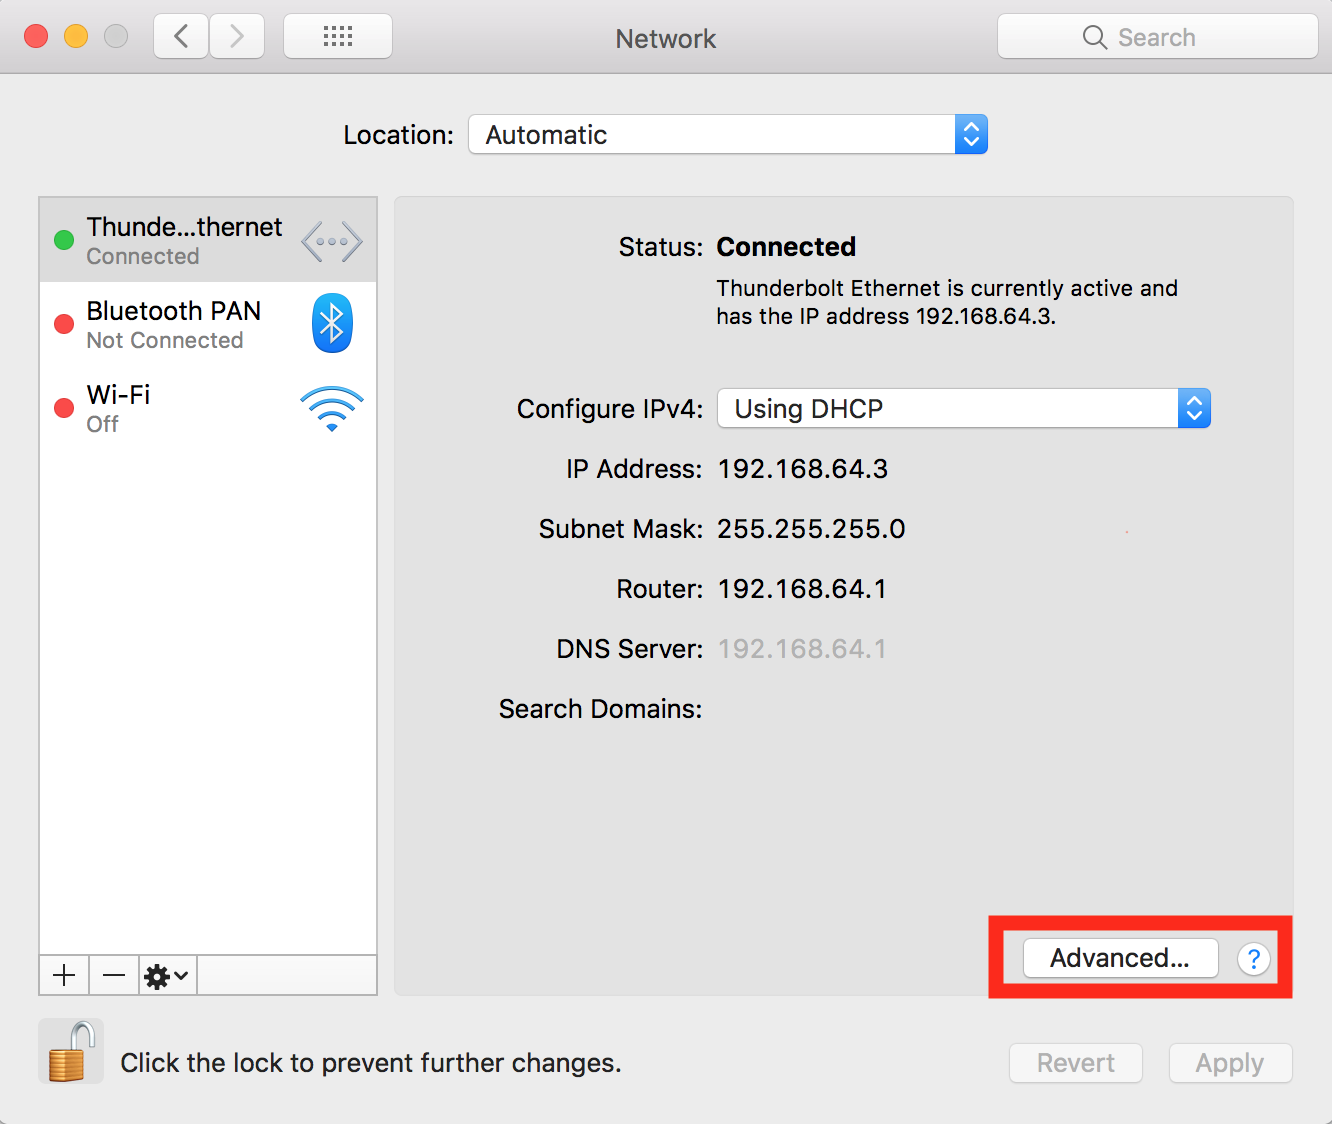
- Choose the “Network” control panel, select your network interface from the left side (“Wi-Fi” or “Ethernet” for example), then click the “Advanced” button in the lower right corner of the Network window

- Choose the “DNS” tab at the top of the screen
As per multiple user requests adding DNS modification settings for MAC
- Go to the Apple menu and select “System Preferences”
- Choose the “Network” control panel, select your network interface from the left side (“Wi-Fi” or “Ethernet” for example), then click the “Advanced” button in the lower right corner of the Network window
- Choose the “DNS” tab at the top of the screen
- To add a new DNS server: click on the [+] plus button
- To edit an existing DNS server: click twice on the DNS IP address you wish to change
-To remove a DNS server: select a DNS server IP address and then click either the [-] minus button or hit the delete key

- When finished making changes to the DNS settings, click on the “OK” button
- Now click on “Apply” for the DNS changes to take effect, close out of System Preferences as usual
My Evidence :
List of default Movies on Netflix when I select "Action and Adventure" BEFORE changing with default DNS servers assigned by my ISP.

List of default Movies on Netflix when I select "Action and Adventure" AFTER changing with INDIAN DNS servers which are configured using above steps.
